Nursery

Well everyone, tomorrow is the day that baby girl arrives! And I promised you all a nursery update, so here it is… you can spend your time reading this while you anxiously await her arrival… no, just me (and of course my family!) anxiously awaiting her arrival? I’m sure I’ll post a pic to the Facebook page sometime in the next few days, but for probably the next week (at least) I’ll be MIA, recovering from the c-section and soaking up every minute with a precious newborn.  So in the meantime, enjoy the nursery!

We decided to go with a turquoise-y teal/navy theme for this room.  It mostly started when my mom found this super cute mini crib on clearance in a beautiful turquoise color. And from there, the rest of the room sort of evolved.

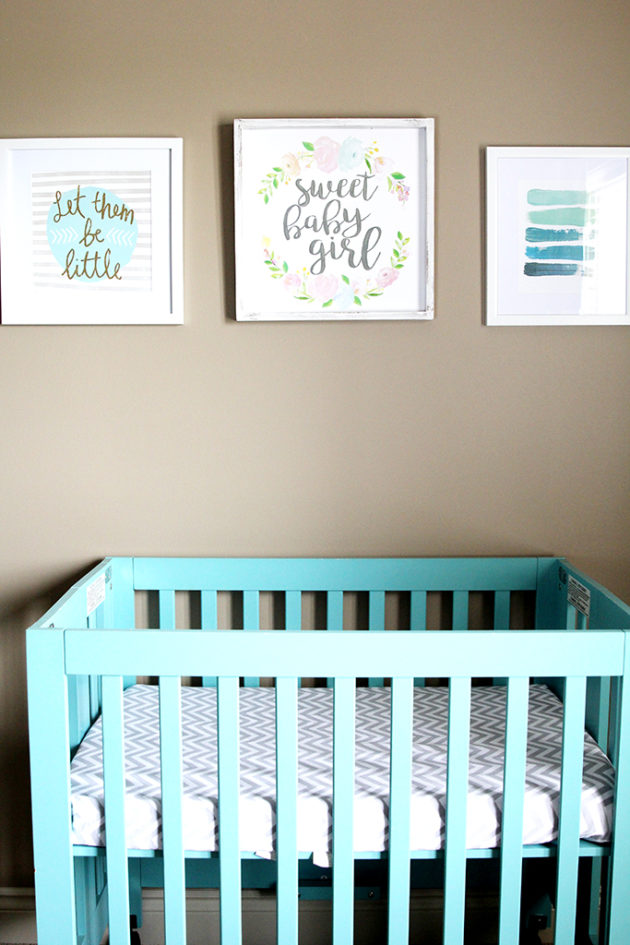
Hobby Lobby has a whole bunch of super cute artwork right now, so all three of these pictures above the crib were snagged from there, and a few of them even at 50% off!

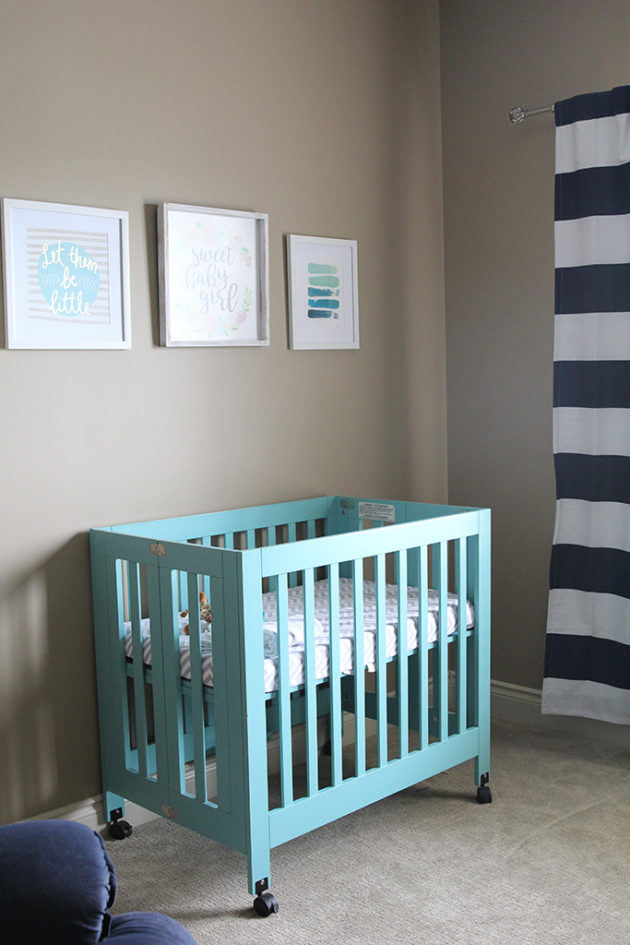
We decided to go with the mini crib because Taylor is still sleeping well in her crib and shhhhh… she doesn’t know she is perfectly capable of climbing out. And with so many other changes in her life, we aren’t wanting to throw too many other life changes at her.  BUT, I think by the time new baby girl is too big for this crib, Taylor will have figured that out and will be in a big girl bed and we can move her crib into here.

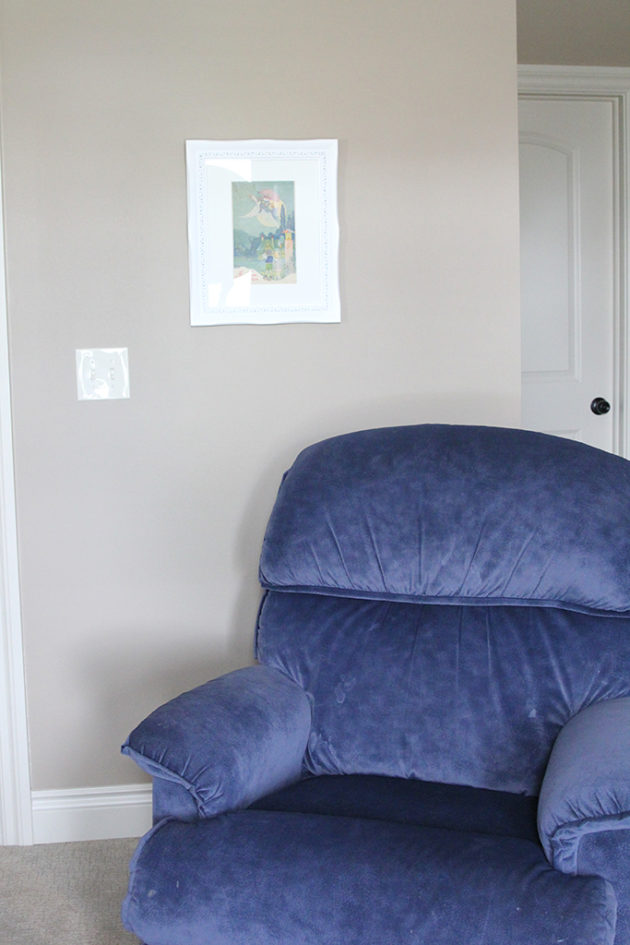
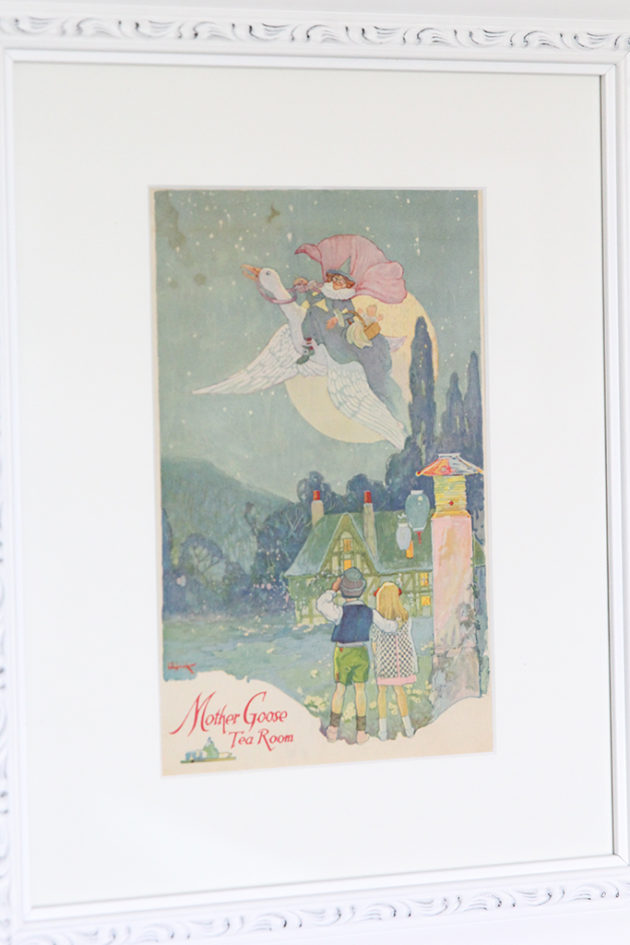
We debated whether or not to buy a fancy glider or rocker for her room, but finally decided that the OLD la-z-boy recliner in our basement would match, is CRAZY comfortable and since I would be spending a lot of hours in the middle of the night hanging out nursing here, we decided to go with comfort over beauty.  And I’m pretty sure I’ll be happy with my decision in 6 months when baby girl is still waking up for 2am feedings. I’m still looking for a small table to put next to it, and maybe a lamp, but I love the little picture I framed above it.  Its a menu from a tea room in St. Louis that my grandmother had saved, presumably because she thought the menu was so cute.  I loved that it fit the colors of baby girl’s room, and brings in that touch of her that I would have missed without it.  It still makes me sad that she won’t get to meet this baby girl, because she loved Taylor and getting to spend time with Taylor so much.

The blackout curtains were a Target find– I love the navy and white stripe and the pop of color it brings to that end of the room.  Especially since I know that they will almost never be opened like this… and I’ll have to live with closed off curtains most of the time, because lets face it, open windows are not conducive to infant sleep… and everybody loves a sleeping infant.

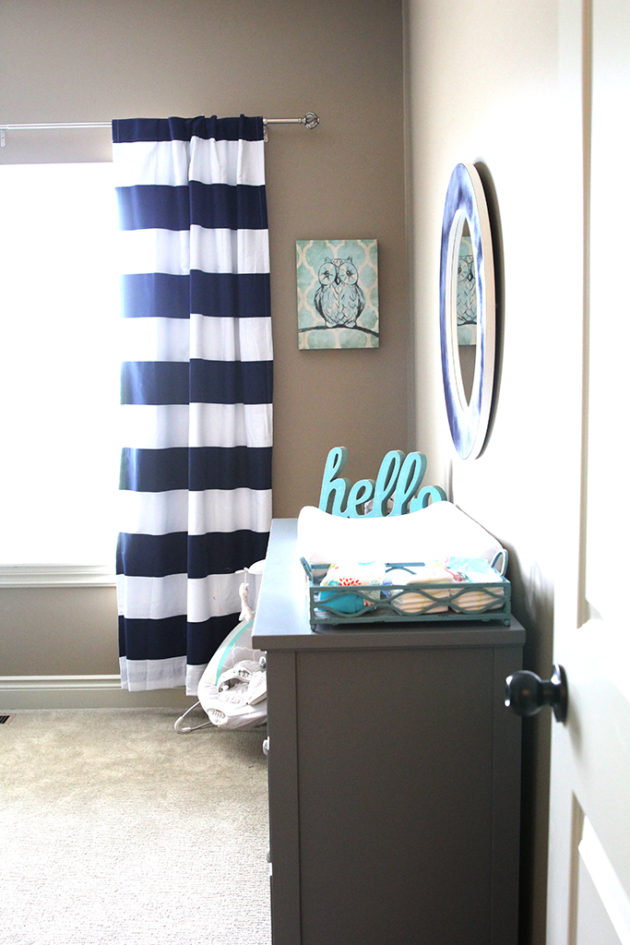
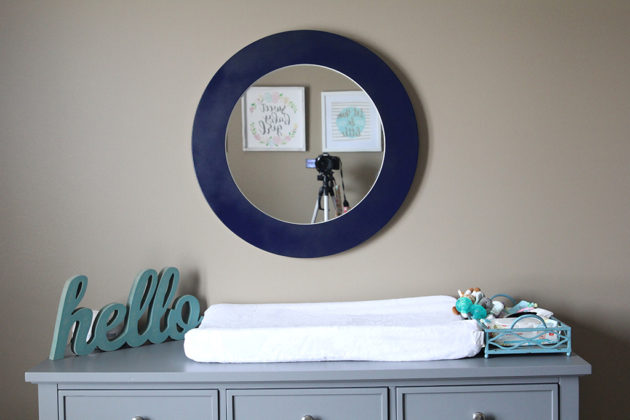
The dresser was what we call an ‘investment’ piece.  We decided to take the plunge and spend the money on a nicer dresser from Pottery Barn Kids. It is the Elliot Extra Wide in Charcoal if you were looking for something similar.  We are pleased with the quality and size.  It looks great in there! In Taylor’s nursery, I bought a hand me down dresser in Waco one weekend and repainted it when I wanted it white and not cream. Its a beautiful dresser, and I still LOVE the look of it, but some of the drawers are not very easy to open and close, and at least one of them is mostly beyond repair.  So we decided for this room we wanted one that at least had functioning drawers.

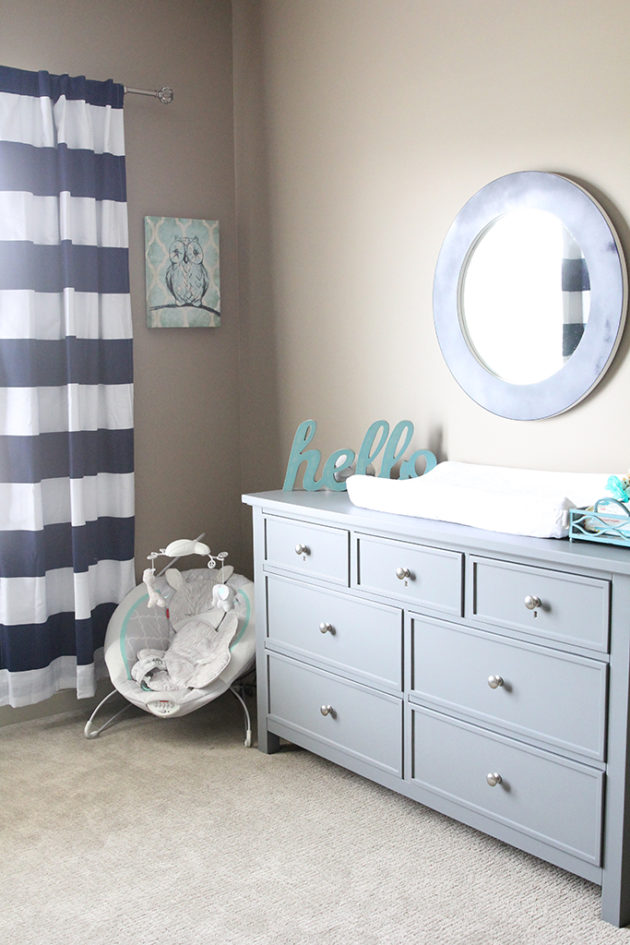
The mirror is an OLD Ikea mirror that we have had for YEEEEEARS- like maybe 12 or 13?  My mom had the brilliant idea to paint the face of it Navy to match the room and I LOVE the way it turned out! She just taped around the edges and spray painted it Navy. It looks perfect above the gray dresser and really ties in all the pieces in the room.

And that’s where baby girl will live for the foreseeable future! I’m sure as she gets older, the room will evolve a bit, but I love the way this turned out.  I love that it is very different than Taylor’s first room was, and that she will have a space that is very much her own! Although I am sure that their shared Jack and Jill bathroom will be the source of many shenanigans over the years, I love that they will be connected there as well!

Pray for us as this new phase of life begins!

Nursery Complete!

So it is officially down to the count for Baby Girl to arrive, with only 6 days until her due date!  This past weekend my mom and I finally put some of the finishing touches on the nursery and aside from putting a picture in an already hung picture frame and hanging the one last letter I have to hang, her nursery is DONE.  Totally finito and ready for her to come (although rumor is they don’t really spend much time in their nursery for the first little bit!).  But whenever she does, it will be ready for her!!  I’ve blogged about most of the projects as we’ve gone along, so mostly I’ll just show you the final product now!

Coral and Gray Nursery | www.amusingmj.com


It’s not a very large room, but it is so cozy and I love the way it turned out!! Here was my inspiration post, and where I was dreaming of the room going… and it turned out to be just like I wanted it to!!

nurserycomplete2

Right when you walk in you see Baby Girl’s crib with her alphabet wall hanging above it, then her changing table with the Box Valance I made above it.  The alphabet wall is by far one of my favorite parts of the room (although it is hard to pick just one!!).  At my baby shower each of my friends were asked to bring a letter (coordinated by my best friend so there wouldn’t be duplicates!) to hang as an alphabet on Baby Girl’s nursery wall.  I LOVE how it turned out… and mostly I love how I can look at the wall and remember the people who gave me each letter and how much they love this little girl who isn’t even born yet! I love all the color it brings into the room and how eclectic it is… it reminds me of how diverse all my friends are and how lucky I am to have them in my life!

Nursery Alphabet Wall | www.amusingmj.com


On the other side of the nursery is the dresser I repainted, my rocking chair with home-made cushions, and a little side table I snagged from Nebraska Furniture Mart, which is where a lot of the coral accent pieces came from as well.

Coral and Gray Girl's Nursery | www.amusingmj.com

My friend also made baby girl her own ruler to measure her height as she grows!! I love the way it turned out!

Yardstick for tracking height | www.amusingmj.com

The room is full of fun details, and I love all of them! I can’t wait for her to feel at home in this space! One of the things I look forward to most is reading to her! My brother and sister-in-law gifted her a library full of great kids book in hard board book form so she can start reading at a really young age! And of course they look best in rainbow order! (Don’t worry I know this won’t last long!)

Board Book Library | www.amusingmj.com


I’m so excited for her to arrive and to share all the cute details with her!

Coral and Gray Girls Nursery Details | www.amusingmj.com

And it’s hard to imagine that this room looked like this just a few short months ago:

newnursery1

Let’s see those two side by side shall we??  Girl's nursery before and after | www.amusingmj.com


All right, I’ve linked to most of these in the text above, but just in case you want them all in one place, here’s the whole progress on the nursery:

And just for those of you who are curious about some of the sourcing:

  • rug: Dash and Albert 
  • paint color: Light French Gray, Sherwin Williams
  • Light Fixture: Amazon
  • Changing Table: Amazon (we added a piece of furniture grade plywood to the top to make it wider)

Box Valance for Baby Girl’s Room

I knew from the very beginning that I wanted to introduce a lot of color into baby girl’s room because the gray walls and white furniture I wanted to go with would be very pretty and classy, but maybe a little bland.  So I knew that I would need some accessories and fabric to spice up the room.

I added the cushions for the chairs which have a little color in them and my mom was able to snag quite a few coral accessories at Nebraska Furniture Mart to add in some color (which you can see in the photos below or the cushion post).  But I also knew I wanted a bold statement on the window side of the room, and a box valance was just the trick! These are sometimes called pelmet boxes… not sure if there is a technical difference in them, but I call it a box valance.  So I showed you the fabric I bought from Fabric.com in the nursery progress post and it was time to do something with it.  Here it is along with a few prints I’ve purchased along the way to hang on the wall:

DIY Box Valance

This is a SUPER easy project (all up until the hanging part…) and all it requires is some wood, batting, fabric and a staple gun.  Then we also used some L-Brackets to secure it to the wall.

I promised my husband I would work on using the scrap wood we have stored in our garage before I started buying more, so I measured my window and then went to the scrap pile to see what I had that would work. I had a long piece of scrap 3/4 plywood that was about the right width and then we used another scrap piece of 1/2 plywood for the ends.  It wasn’t quite as wide as the 3/4 inch for the front, but since I promised to use scrap and I knew we would be upholstering it AND that those pieces would only be seen from the side… we just decided to make do.  IF you are doing this yourself and not trying to use up wood scraps, make them the same width as your front board.

DIY Box Valance | www.amusingmj.com

We then used our trusty kreg jig and secured each end at a 90 degree angle on either side.  If you don’t own a kreg jig you could also screw these in the old fashioned way from the front.  You’ll be covering it with batting and fabric, so it doesn’t really matter what it looks like underneath, just make sure you secure the end pieces.  We are covering the existing curtain rod, so when we measured our window we gave it some breathing room on either side as well as measuring out from the wall far enough that it would cover the entire curtain rod.  These measurements will depend entirely on your space and the width of your window.  Our front board is approximately 8 feet long and 1 foot tall.

Next up I had the husband carry that inside for me 🙂 then went to work on the upholstering part.  My fabric was not wide enough to go the entire length of my box, so I needed to sew two pieces together.  I mostly just winged this part to get the two pieces to line up.  You can see the crease in the picture below where I had matched it to the piece next to it and then pinned it carefully to keep it together.  I then stitched along my crease where I knew the designs lined up.

DIY Box Valance | www.amusingmj.com

Next up I laid my fabric wrong side up on the ground and then layered two layers of batting over the top:

header7

You can see I staggered the two places where I would have a seam in the batting so that I wouldn’t have a seam show anywhere on the valance.  Then I laid my piece of wood over the top, centered it on my design, and started stapling. I started at the center of the valance and just stapled every few inches until I got to the ends.  I tried two methods of folding the fabric at the corners, and definitely liked doing it like a present better (the one on the left) it didn’t bunch quite as much.

header5

As I was stapling I would lift it up to make sure my fabric was straight across Here it is all wrapped up from the front, what looks like a seam in the middle is actually just a wrinkle even though I SWEAR I ironed my fabric–oh well, it seems to have straightened itself out after hanging on the wall for a few days.  The seam of the fabric is actually about a quarter way in on the left side of the valance, but its hard to see in the picture!

header6

Hanging this guy was the hardest part.  Not seriously hard, but harder than the rest.  And we hung it late at night, so forgive the bad pictures.  To hang this guy, we attached L-Brackets to the wall where we wanted it to hang, and then screwed the L-Brackets into the header.  Our logic for this was that we wanted it to be strongly secured to the wall and knew that we would want drywall anchors to hold it, but with the valance in place, it would be impossible to get a drill in to secure the screws.  So we attached the L Brackets first:

DIY Box Valance | www.amusingmj.com

Here is what they look like installed:

DIY Box Valance | www.amusingmj.com

And then once we had that done, we put the valance up and then screwed the side of the L-Bracket into the valance (right through the fabric and batting).  We tested it out and it is pretty secure.

header10

Here the husband is attaching the last screw which was still a trick to get around the window frame and the brackets for the curtains.

DIY Box Valance | www.amusingmj.com

I love the finished product!!
DIY Box Valance | www.amusingmj.com

I think it adds exactly that balance of color that I was looking for!

DIY Box Valance | www.amusingmj.com


So left on the list for her nursery:

  • her crib (actually already painted and put in the room… I’ll post on that later this week)
  • hang artwork- I have most of it, just need to hang it
  • replace the top of the bookshelf with a wider piece (long story… stay tuned)
  • figure out some sort of closet organization

So the first two items on this list are mostly on their way to being completed, the third is the next project on my to do list, and the third is a: I hope I get to this before baby girl is born kind of project! But I absolutely love where this room is going and what it looks like now! It makes me so happy to walk by it and think about how much baby girl will love it!


Have you missed a nursery post?

Here is my inspiration, here’s a little more of the planning, here’s a dresser update, here are the chair cushions.