DIY Shield

When I married my husband I inherited some pretty awesome nephews and a fabulous niece.  They are a ton of fun to be around and my husband and I love playing with them. Our garage is the go to place for projects, so last spring we helped the oldest make a Derby Car for Boy Scouts.  So when he needed to make a shield for a school project, he thought it would be fun to make it out of wood.  We were of course happy to oblige.

For projects like these I think it is really important to teach the kids a few basics in DIY and tool safety.  So while I did most of the heavy cutting, the rest of the project was all Jax.   This was a simple project that took less than 30 minutes to do and has a super fun result!

Our supplies were:

  • 1/4″ piece of plywood
  • leather straps from Michael’s
  • staple gun
  • sandpaper
  • jigsaw
  • paint


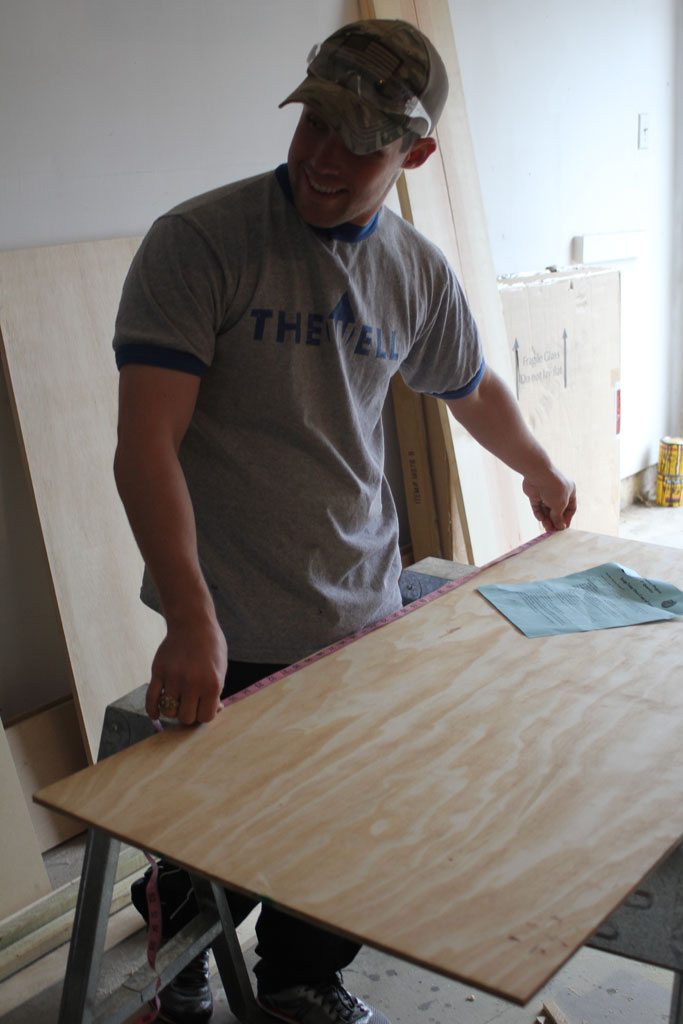
First, since this was a school project we had to follow certain dimensions.  Yes I own more than 3 measuring tapes, no we couldn’t find a single one, hence why the husband is using my sewing measuring tape to measure the plywood.  What can I say, we live on the edge (of insanity… daily).

shield1


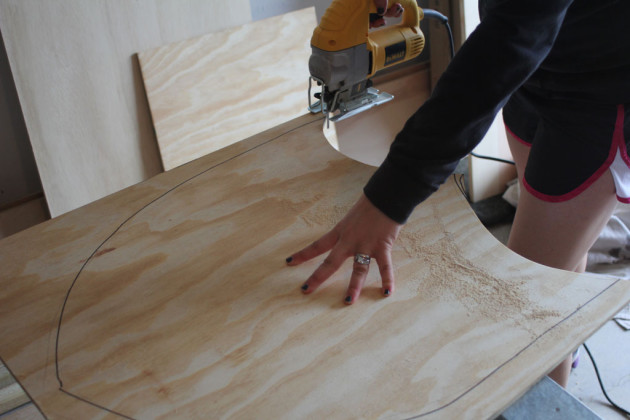
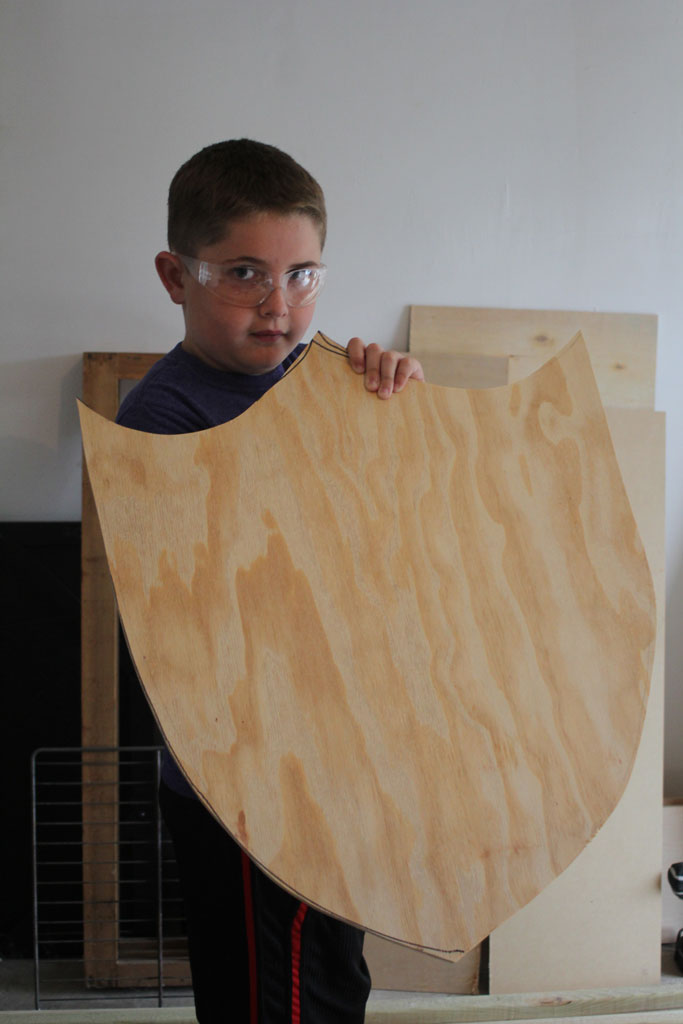
Once we had the dimensions marked, Jax showed me a picture of what he wanted it to look like and I free handed the shape onto the board and cut the shield out with the jigsaw.

shield6

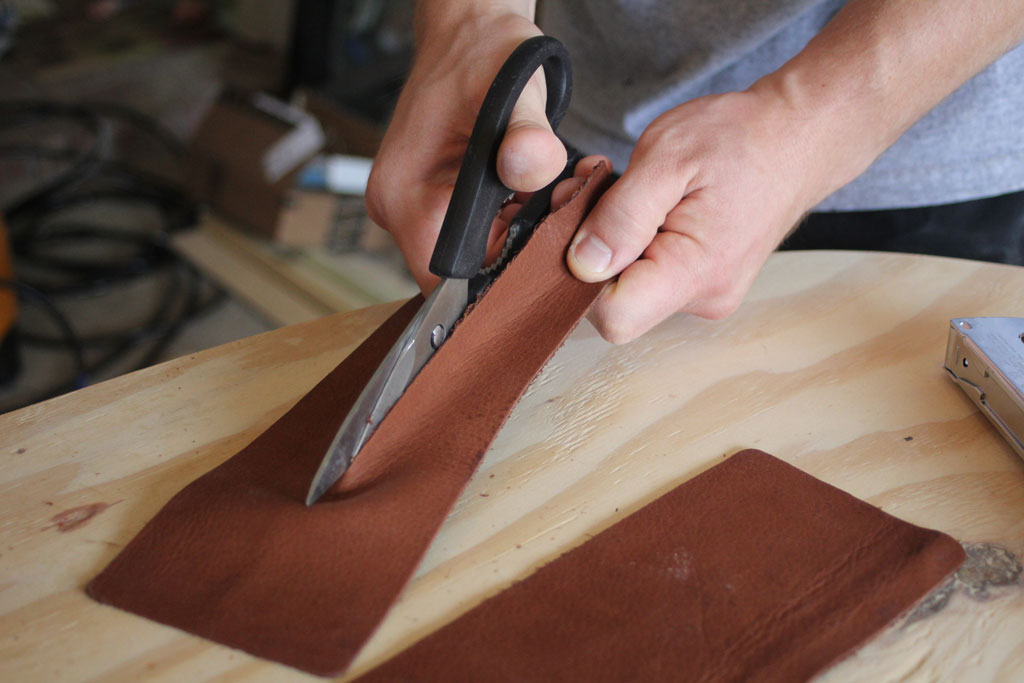
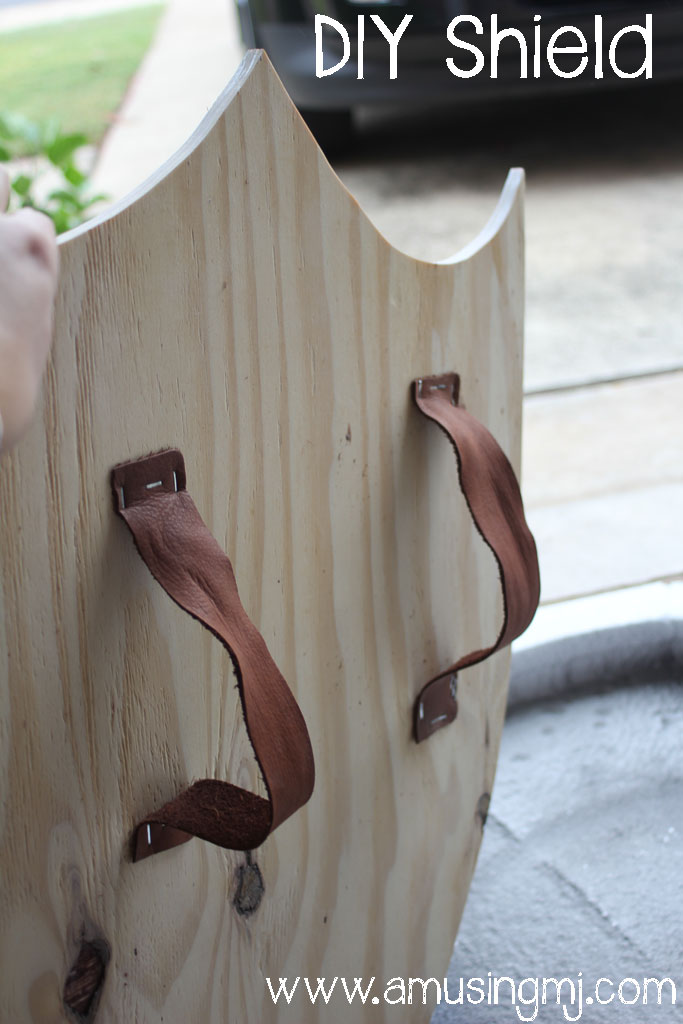
Once that was done, we cut our leather strips.  We found these on the same aisle as belt making supplies (?!?) at Michael’s.  We just stapled them onto the back of the shield, making sure to use staples that didn’t go all the way through the board.  And since this is Jax’s shield we just placed them over his arm to find placement and spacing.

shield10

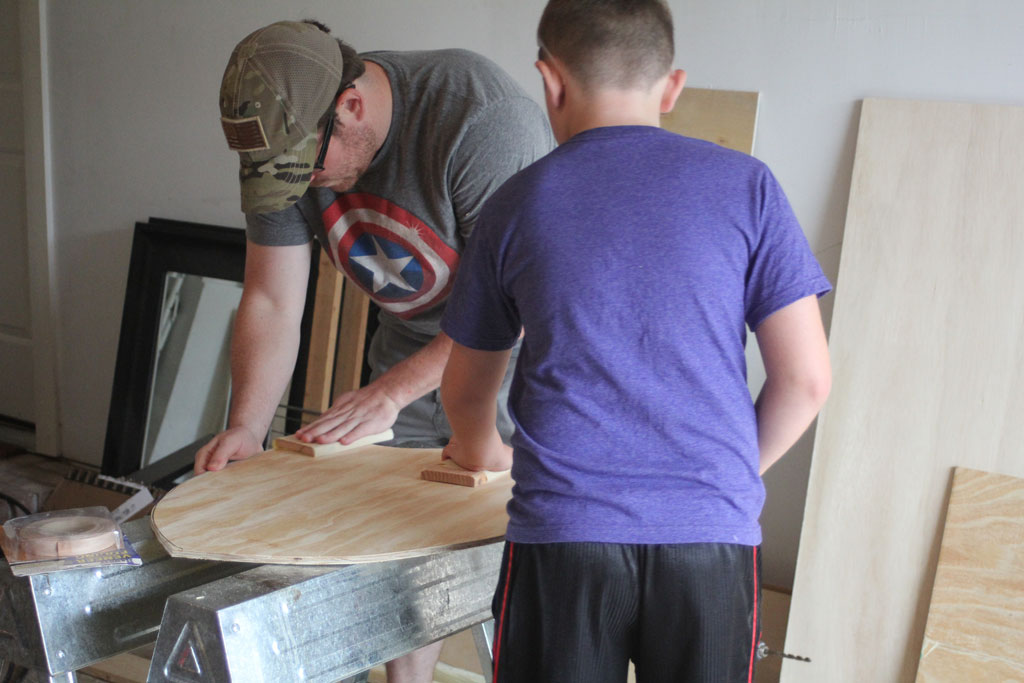
Next, Jax and his dad sanded the top and edges of the shield.  We taught Jax the #1 rule of sanding: always go with the grain of the wood.

shield4

It’s starting to look like a real shield now!

shield5

Next up, painting.  Jax’s assignment is to draw things on each of the four quadrants of the shield to represent him and his family (I’m pretty sure we all did a project like this in elementary school).  The plan was for him to do that part at home, but he wanted the background to be white so we decided to spray paint it in our garage (especially since I already had the spray paint box set up from the mirror).

shield3

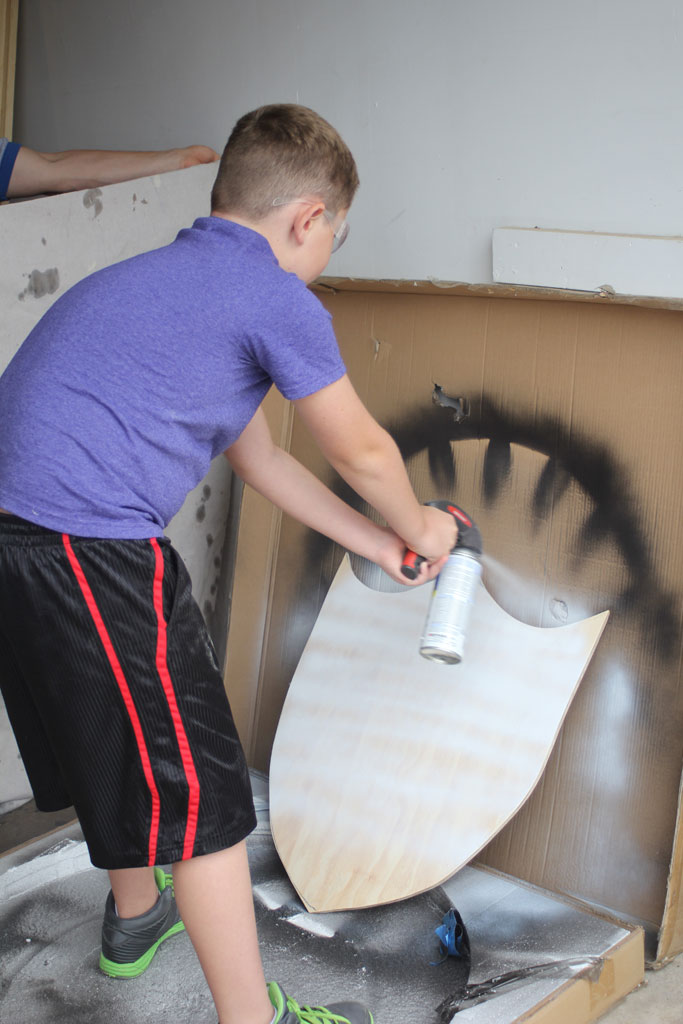
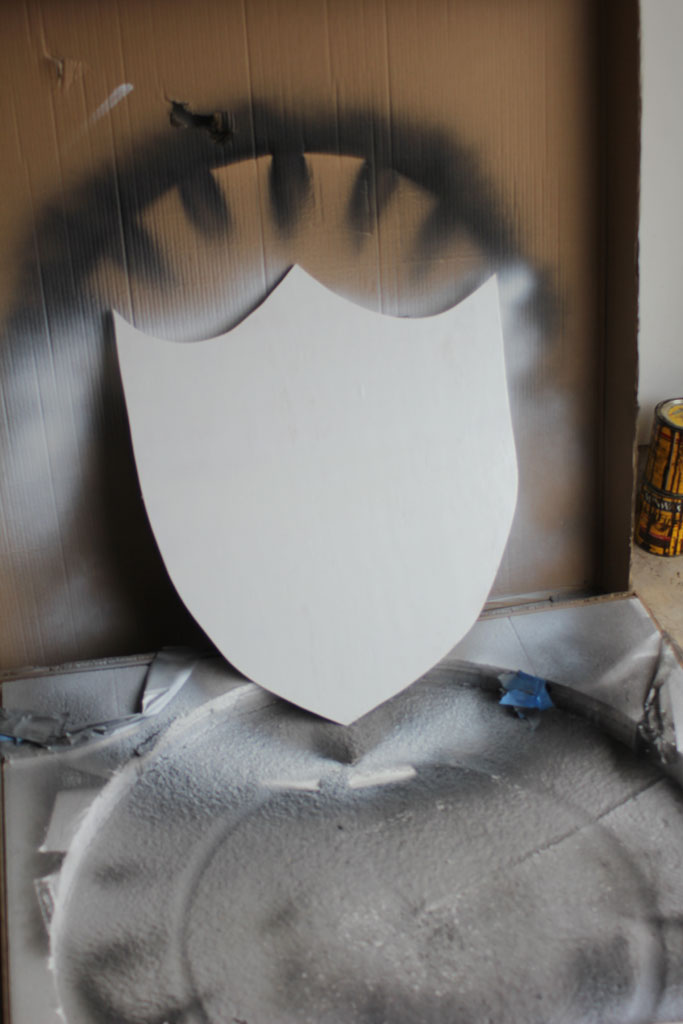
After two thin coats, the shield was done!

shield2

This would be a fun way to spruce up a superhero costume for Halloween! It can be cut out in any shape, painted with any decor, and Jax was pretty excited about getting to be a superhero!

shield9

And just for a fun little side note… since there were 3 other kiddos we set them up in the living room to watch a movie on TV (unfortunately my house isn’t super kid friendly and their normal place to play is in mass chaos right now as we try to revamp it).  We weren’t out in the garage for very long, but when we came back inside, all three kids had decided it would be more fun to watch the movie from inside Lexie’s crate. I’ll spare you the picture so it doesn’t look like child abuse, but your imaginations can run wild.  Oh to be a kid again…

Craft Night

One of my ‘extra-curricular’ activities involves leading a group of senior high school girls in a weekly covenant group.  I’ve been with these four girls meeting (mostly) weekly for the last year and a half.  Although at first I was hesitant about adding another hours worth of activity to my weekly schedule, these girls have been such a HUGE blessing to me.  They are a constant reminder to be grateful for the path I have taken and to take life a little less seriously.  I love hanging out with them and participating in each other’s lives.  Since they are all headed off to school next year they decided that we should spend some of our covenant group times doing crafts for their dorm rooms.  Since I love any opportunity to craft, I was game!

Our first night, one of the projects was a fabric/ribbon covered bulletin board.  Here are the supplies:

  • a quarter sheet of mdf or plywood (or whatever size you want your bulletin board to be)
  • cork (I bought a roll of it at Micheal’s)
  • spray adhesive
  • quilt batting
  • fabric of your choice
  • coordinating ribbon
  • thumbtacks

First cut your cork to the same size as your board and use the spray adhesive to secure it to the board.  It helps if you have old MBA textbooks lying around uselessly (and a modern art book for good measure) … they make great weights to make sure the cork sticks.

craftnight4

Next take your quilt batting and fabric and cut both to be about an inch or inch and a half wider than your board.  If you have a pattern be sure that your pattern is facing the right direction and centered on the front before you cut it! Now lay your board (with cork attached) cork side down on your upside down fabric and quilt batting like this:

craftnight3

Now use a staple gun to pull your fabric taught on the front.  I find it easiest to staple the two long sides first moving from the center out to the edges, alternating sides.  For the corners, I take the corner of the fabric and fold it in towards the center and then fold each side on top of that and staple.  (sorry there isn’t a picture, it took all our hands!)

craftnight2


Now you can flip it over and lay out your ribbon how you want it to be (we created about 4″ squares on ours).  Then at the intersection push a thumbtack into both pieces of ribbon and the fabric and into the cork.  On the back, secure the ends of the ribbon down with a dab of hot glue, and you are done!  We didn’t put anything on the back to hang it, but you could easily drill some D-rings on the back, or since it is for a dorm room just pick up some double sided Command picture hanging strips.

Look how cute Megan is with her new craft project!

craftnight5

 And you’ve seen what this room looks like when its clean, but here’s what it looks like when I get my fabric stash and 4 girls all doing craft projects at the same time!!

craftnight1


Wreath 2.0

After making this wreath for a friend out of old ribbon and fabric, I saw a friend who made a wreath out of felt flowers, and I loved it! So I googled around to see how to make felt flowers and found this blogpost showing how to make them.  I picked three to try out for my wreath

wreath1

I’ll walk you through how to make my favorite the one with curvy edges above.  And then I’ll show you how to start the other two, which are simple once you learn how to do the first.  First cut out a square of felt.  The bigger your square the bigger your flower, mine are about 4″ square to make the bigger flowers above and 3″ square to make the smaller ones.

wreath2

Now just cut wavy lines in a circle:

wreath8

Don’t worry too much about keeping them even or perfect, the imperfection makes them more fun! Keep going until you have one long line:

wreath7

Now take the end that was the center of your square (shown at the bottom of the picture above) and start rolling the felt around holding it with one hand as you wrap with the other hand, it should quickly start to look like a flower!

wreath6

When you are done just stick a dab of hot glue on your end and tuck it under to keep it together.

wreath5

To try out different looks you can vary how high your waves are and how tightly you wrap your flower up.

For the flatter flowers in the wreath do the same as above just with straight lines so that your string of felt looks like this:

wreath4

And for the loopy flower cut one long strip of felt (mine was about 10″ by 2″) fold it in half and start cutting strips half-3/4 of the way through your fabric like this:

wreath3

Now start at one end and just wrap it into a circle until you have the flower the size you want it to be! And now its time to hot glue your flowers to the wreath however you want to.  I like them clumped at the bottom right of the wreath:

wreath9

When you are done, hang on your door! I actually made the one above for a friend to celebrate her birthday (and the start of football season… Rock Chalk?)

I liked it so much I made another one for myself and hung it on my front door:

wreath10

The husband thinks we should add maroon and white flowers to the top left since TECHNICALLY we root for his beloved Texas A&M Aggies in the fall, but doesn’t he know that  Maroon and White clash with Crimson and Blue?