Crinkle Toy

I realize that this is my 3rd baby related post this week, so apologies for those of you who aren’t really in that phase of life! And apology number two, I really wasn’t sure how this project would turn out, so I didn’t photograph it during daylight hours, so the pictures are pretty terrible, but the project turned out so well that I had to share it!

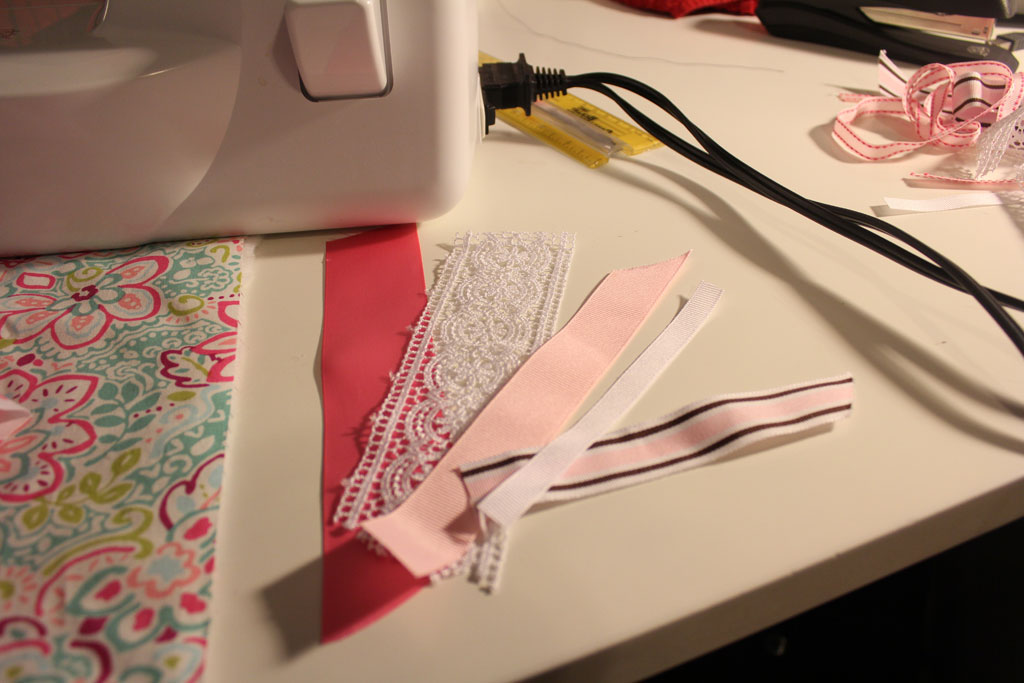
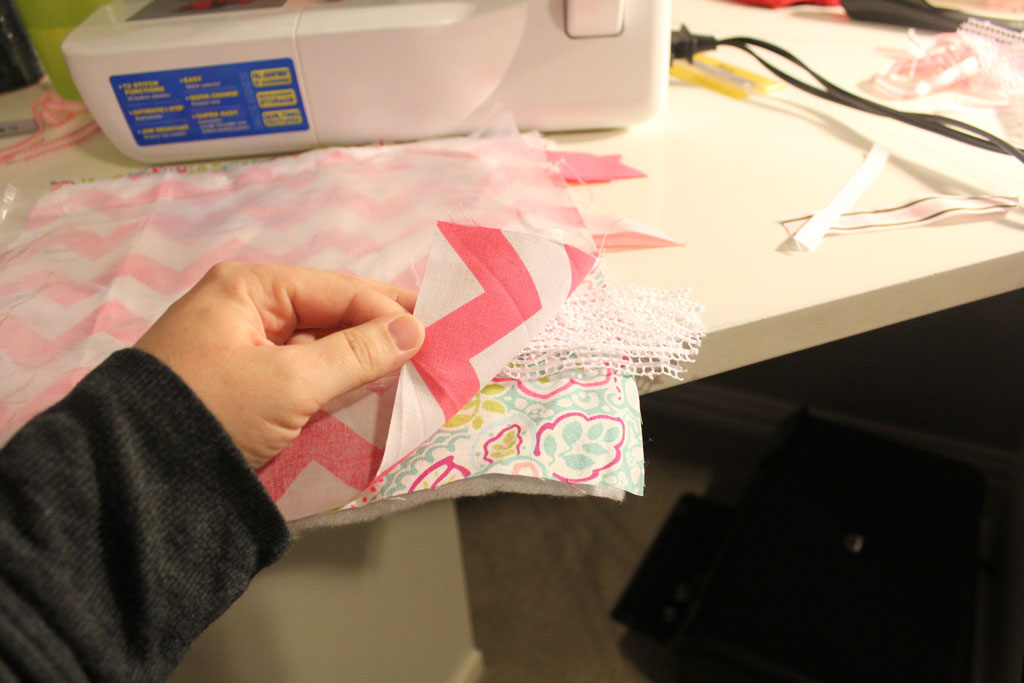
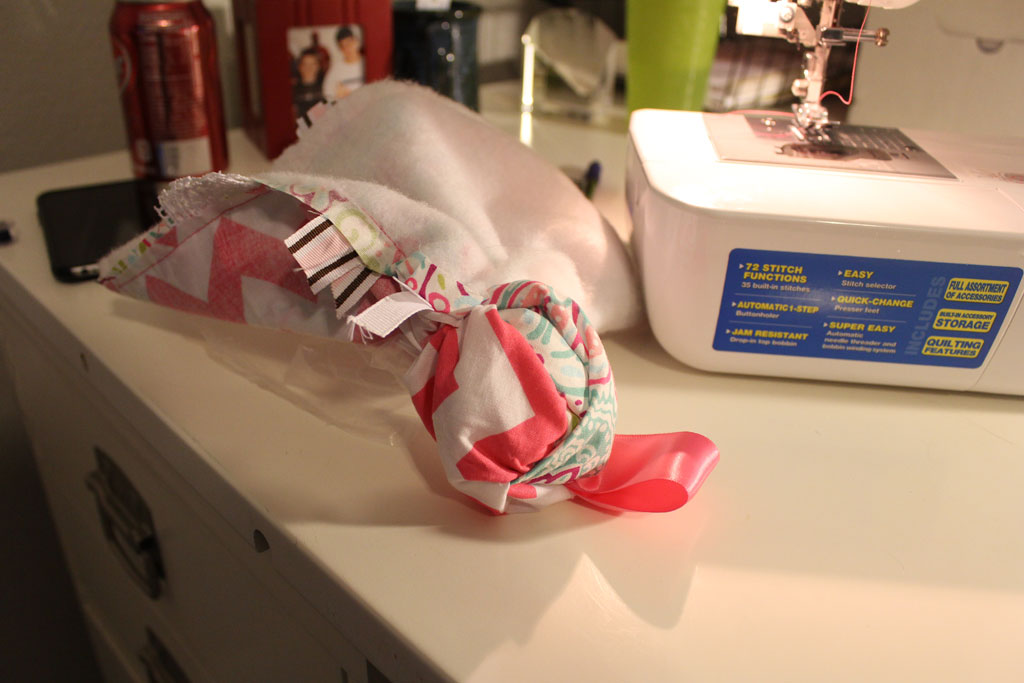
I have seen several toys for young babies with the ribbon pull tabs and always wanted to make one (I have boxes of scrap ribbon that I just knew would be perfect for a project like this… remember me the hoarder? This is why).  I literally made this project with all things I had on hand in my craft scraps and one random kitchen item.  That random kitchen item? A Cheez-It bag.  I had read on a sewing blog sometime a while back (can’t for the life of me remember which one) that to make a child’s toy have that crinkle sound that they love so much to use a cereal bag (washed, of course) on the inside.  So when I decided to make this toy for a friend, I just decided to wrap all the fun things into one toy and add in a crinkle layer.  But since we didn’t have any empty cereal bags, I settle with the recently finished off Cheez-It bag.

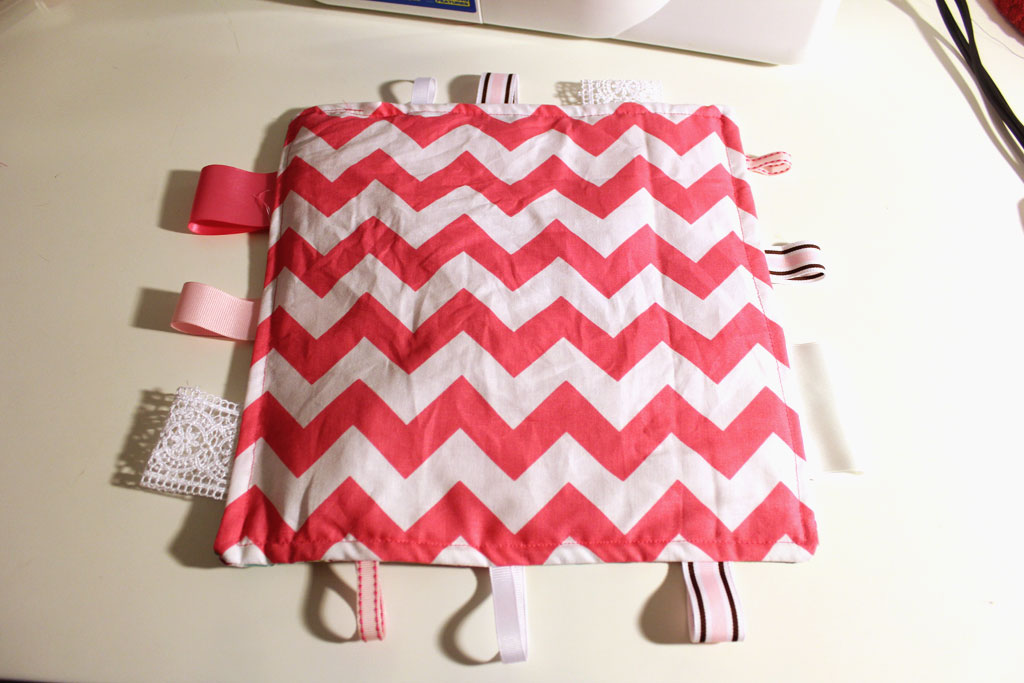
So here is what I made:

crinkletoy4


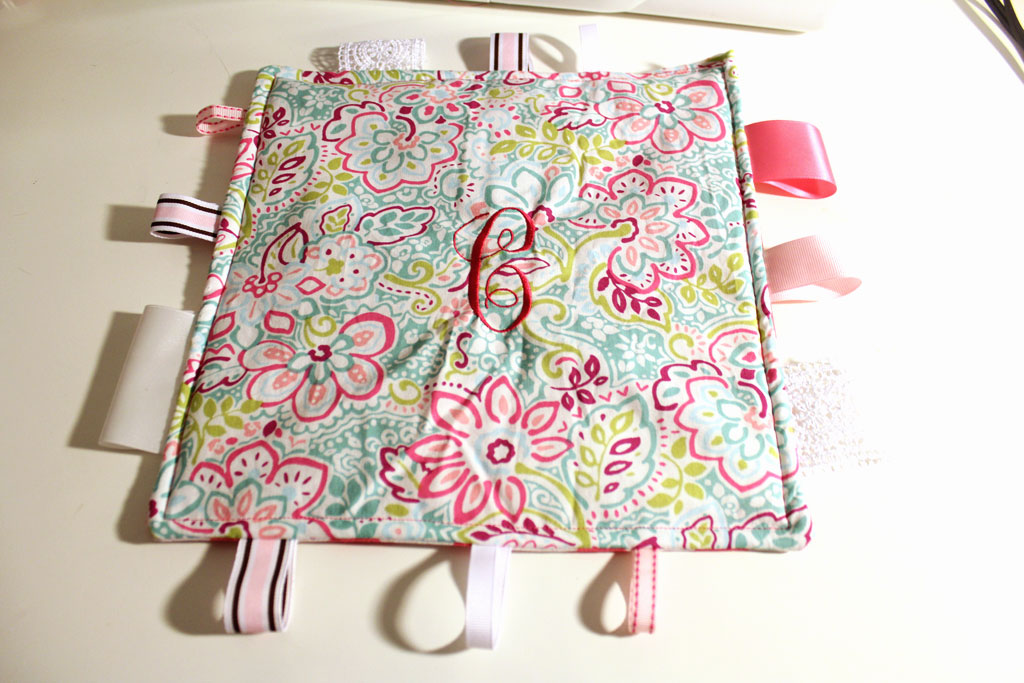
First I used my embroidery machine to put her initial on, but that is a totally unnecessary step if you don’t have an embroidery machine! My two fabric pieces are 12×12, but depending on what size you want, you can adjust accordingly.

So here’s what you need:

  • two pieces of fabric 12×12
  • an empty and washed cereal bag (or other snack food bag) cut to 12×12  (mine actually wasn’t tall enough to do 12×12 so I just made it 12″ wide)
  • 12 or so pieces of various ribbons approximately 5 inches long
  • one piece of 12×12 batting (optional if you want to make it a little more cushionier)

crinkletoy1

crinkletoy5

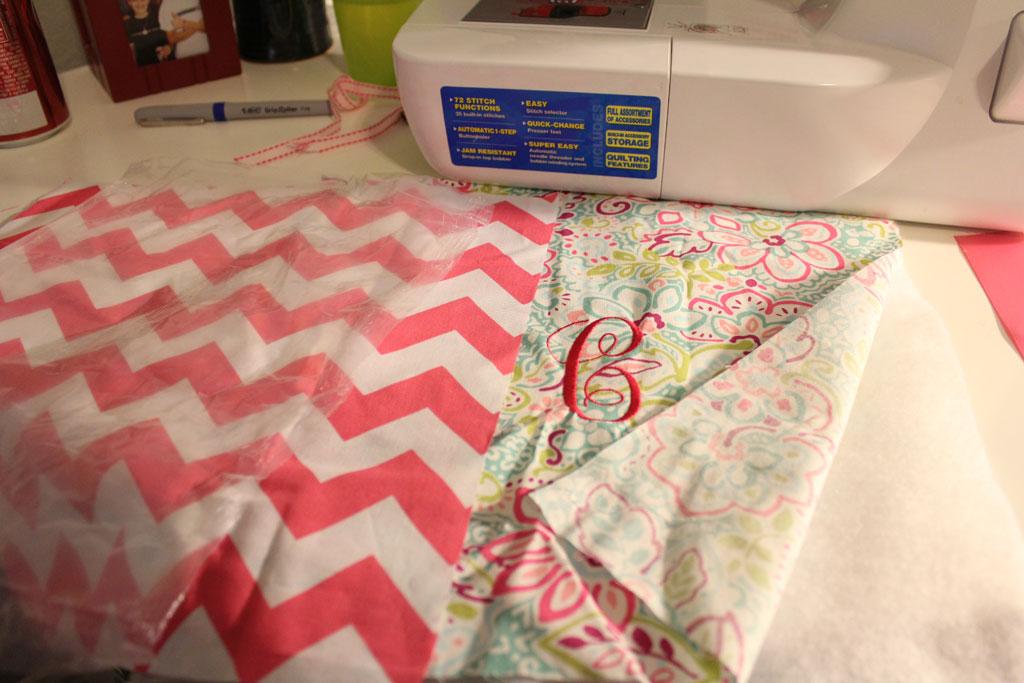
When you lay it out to sew you will have them in this order: batting, fabric 1- right side up, ribbon (folded in half with at least a quarter inch sticking out), fabric 2-right side down, then your cereal bag.  I left a little extra ribbon hanging inside because I wanted to be extra sure there wouldn’t be a loose end come out that the baby could choke on. It would also help if you had pins to pin this together and keep your ribbons in place, but somehow those went MIA in the move and I was sewing this during a snowstorm, so I didn’t leave to go get some… I just decided to go for it.  However I will say, this is DEFINITELY a project pinning would have helped with.

crinkletoy2

Then just sew a straight stitch down all four sides leaving a small hole for turning.  For square projects like this I start at one corner, backstitching the end, then go to the first corner, leaving my needle in the fabric I lift my presser foot, turn the project 90 degrees and sew the second side, continuing until I get to about 3 inches from the corner on the last side and backstitch again.  Trim your corners and then turn your project right side out.

crinkletoy6

I wasn’t sure what would happen if I ironed the project with the plastic wrapper inside, so I decided to play it safe and leave it un-ironed (melting plastic is not my favorite smell).  But since it is going to a baby I don’t think she’ll care that it isn’t ironed.  To finish it off, I topstitched around the edge.  And now baby C will have lots of little ribbons to grab ahold of and it makes a very satisfying crinkle in the middle! A perfect baby toy! crinkletoy3


Play Kitchen

I’m so very excited to show you guys this project!! As you may recall from previous posts (like this one and this one) I have the cutest niece on the planet.  Well, sometime in October my mom was surfing through Pinterest (a very dangerous thing to do) and saw a post where someone had turned an old TV stand into a play kitchen for kids.  And lo and behold, my parents have been moving this beauty from house to house for 25+ years:

playkitchen8

Once upon a time it had glass fronted doors on the left hand section, but they are long gone.  And since this guy was just being used for storage in the basement, it made a GREAT candidate for a play kitchen for Juliette.  And since she was coming to visit for Thanksgiving, we had a deadline.  Fair warning, there are going to be LOTS of pictures in this post, so for those of you who are impatient enough to want to see the final product, here is a teaser of how much Juliette loved her play kitchen!

playkitchen2

It was a HUGE success, she loved playing with it, especially since it was in Mom’s kitchen, meaning she could play while everyone else gathered around and caught up on life.  Perfection.


Now for the nitty gritty, and as a reward for those of you who make it to the end of this post, there are a ton more pictures of my precious niece playing with her kitchen.

First off we went shopping for supplies, (the first of many trips to Home Depot during this project) but it is an important step! We wanted to make sure we had the bowl for the sink and the faucet so that we could drill the holes for those before we painted.  Using my jigsaw we cut a rough circle for the sink and using my drill and bits we cut the right holes for where we wanted the faucet to go.

playkitchen14

Next up we painted.  We decided we wanted most of it to be a robin’s egg blue color, but we wanted the inside of the fridge to be white, and we wanted it to have a black baseboard that ran across the whole project.  We also decided we wanted the one cabinet door to be white.  It took a couple coats of paint everywhere (especially the white over the dark wood).  But we left the ‘countertop’ open because I had extra hex tile (from tiling my backsplash) and we thought it would be fun to have a tiled counter top.  But this project also reminded me how much I hate working with tiny little hex tiles.  Love the way it looks, hate nipping those little suckers.

playkitchen9

For the next step we tiled the counter- if you want a tutorial on tiling see the link above about tiling the backsplash- This was not the smoothest tiling job I have ever done, but the good news is… its a play kitchen, and perfection was not our goal.

playkitchen13


At this point we decided the project would be cuter with a piece of wood covering the back and a ‘window’ cut out of it.  Which means? Another trip to Home Depot.  We decided to just use 1/8th inch plywood stapled to the back of the unit, but used some white trim to create the ‘window’ look. And really, her kitchen wouldn’t be complete without a small backsplash of her own, so we used some more of my leftover tile, and created a small back splash on the back piece.

playkitchen7

We used liquid nails to hold down the trim, the blue tape is just holding it in place until it dries.

While that was happening, we needed to create doors for the ‘refrigerator’ and make the one cabinet door look like an oven.

For the fridge doors we just used 1/2 furniture grade plywood cut into two longer strips (measured to fit) and spray painted with a metallic silver spray paint. Once they were dry we added handles and hinges to finish off our fridge.

For the oven, we used the existing cabinet door, painted it black, but added 1/8″ plywood on top (with liquid nails) painted in the same silver as the fridge doors to give the appearance of the stove door with window.

playkitchen11

Once we had it painted, we used two cabinet hinges on the inside bottom to allow it to be pulled out like a real oven door.

Unfortunately I don’t seem to have any good pictures of the ‘stove top’, but we used more of the 1/8″ plywood, painted in the same metallic silver, and then used 4 square dowels to create the look of the burners.  You can see it a bit in the final pictures down below.

At this point, the kitchen was ready to go, it just needed some decor!

playkitchen12

If the oven looks a little precarious in the picture above it is because it wasn’t actually secured at this point in the process, we hadn’t attached the hinges.

For the final product we added some knobs to the front to control the stove, curtains (hand sewn by mom), some hooks for utensils, a towel rack and towel, and LOTS and LOTS of fake food from Ikea.  Ikea has an awesome selection of felt food that is perfect for a one year old.

OH! I almost forgot, we also added some logos with vinyl from my Silhouette Machine, and those lights?? 10 LED battery operated lights from Home Depot.  They turn on with a push of the button and will auto shutoff if no one touches them for 30 minutes. GENIUS. They totally improve the look of the project!

And Viola! ready for Miss Juliette to play to her heart’s content.

playkitchen15


And play she did… she loved it!!!  (and so did her Nanny!!!)  And yes… they have matching Aprons!

playkitchen1

What shall I have for lunch today? Fish? Bread? Lettuce? They are all so felty!

playkitchen3

playkitchen4

Maybe she’ll learn to wash dishes early?

playkitchen6

This one isn’t really related to the kitchen, but it was so cute I couldn’t help but to share… this is my 94 year old grandmother having a tea party with Juliette and my favorite bear from my childhood.  There are so many things I love about this photo!

playkitchen5


playkitchen


Juliette’s First Birthday

So I might be a tad bit biased, but I have the cutest niece on the face of this planet.  Remember when I showed you guys the monthly onesies I made? She is the proud (as proud as an infant can be!) recipient of them!

juliette-first-birthday1

I got the opportunity earlier this month to go visit her for her first birthday party! My brother and sister-in-law have some great friends and definitely know how to put on an awesome party, so it was a great time. The party was complete with an Ice Cream Sandwich Truck which was a huge hit among kids and adults alike!! That and the bubble machine were a recipe for a successful first birthday party.  Well that and balloons:

juliette-first-birthday4

For her gift I decided every little girl needed to ride in style so I got her a Red Flyer Wagon.  And because really what gift is complete without a little personalization? So I put my new Silhouette Machine to good use and added her name in vinyl to the side.

juliette-first-birthday3

And so that all the other kids will know its still her when she leaves them in her dust, I added an initial to the back:

juliette-first-birthday2

I think she’ll look pretty cute going to the park in her new shiny red wagon, don’t you?!  She seems pretty happy about it!

juliette-first-birthday