Archives for March 2014

Yellow and Gray Nursery

This is one of those awesome projects that I take absolutely 0 credit for, except for my excellent choice in friends.  My BFF and I have been inseparable since the first day of high school (where I bounded up to her with entirely too much enthusiasm and just wouldn’t take no for an answer on being friends).  But we’ve been through a lot together and I imagine we still will since hopefully we have a lot of life left to live together!

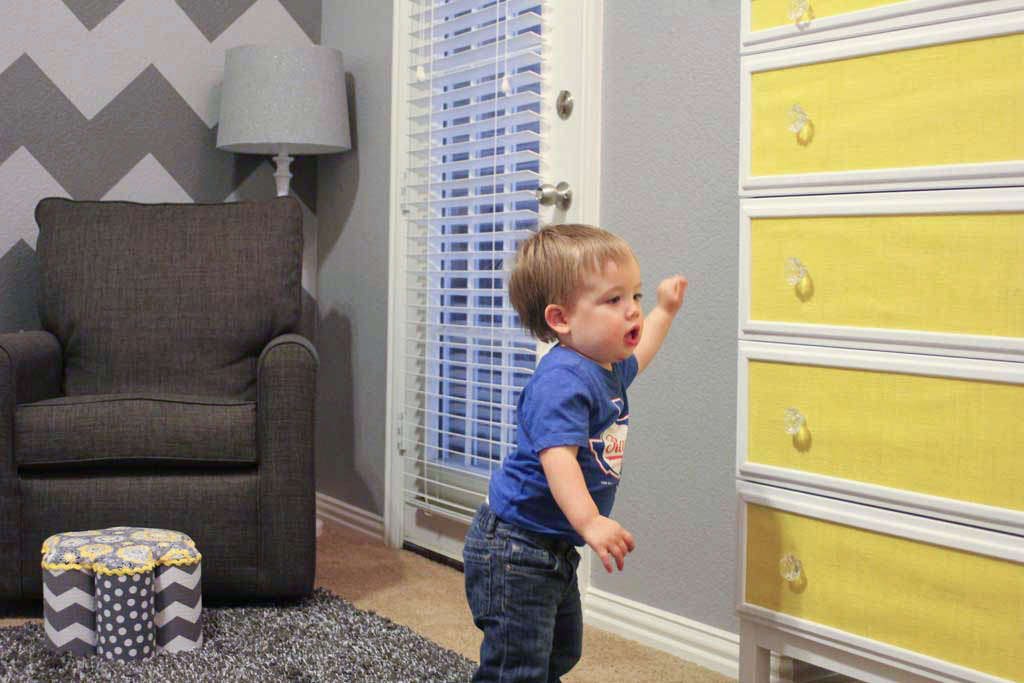
She just had her first daughter and they did the nursery up right!! I just had to show you guys! Amy’s not a super girly girl, so pink and/or purple isn’t really her style, but they nailed this Yellow and Gray themed nursery.  I went over last week to snap a few pictures and I had the best tour guide (Cooper, the very proud older brother).  But enough chatting… let me show you the pictures!

amyshouse-1-2

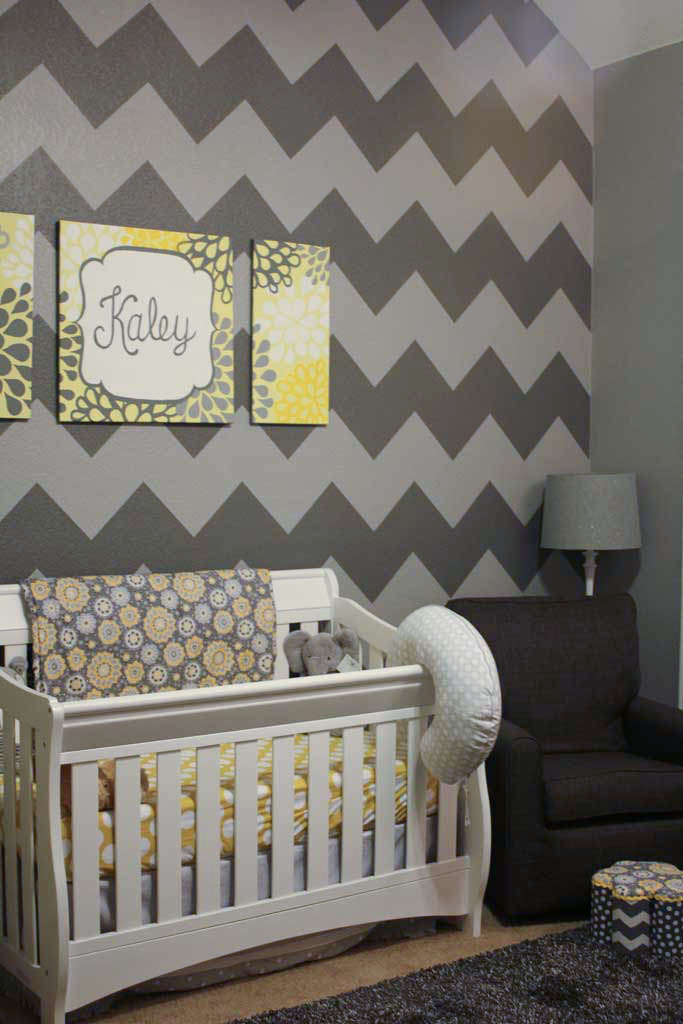
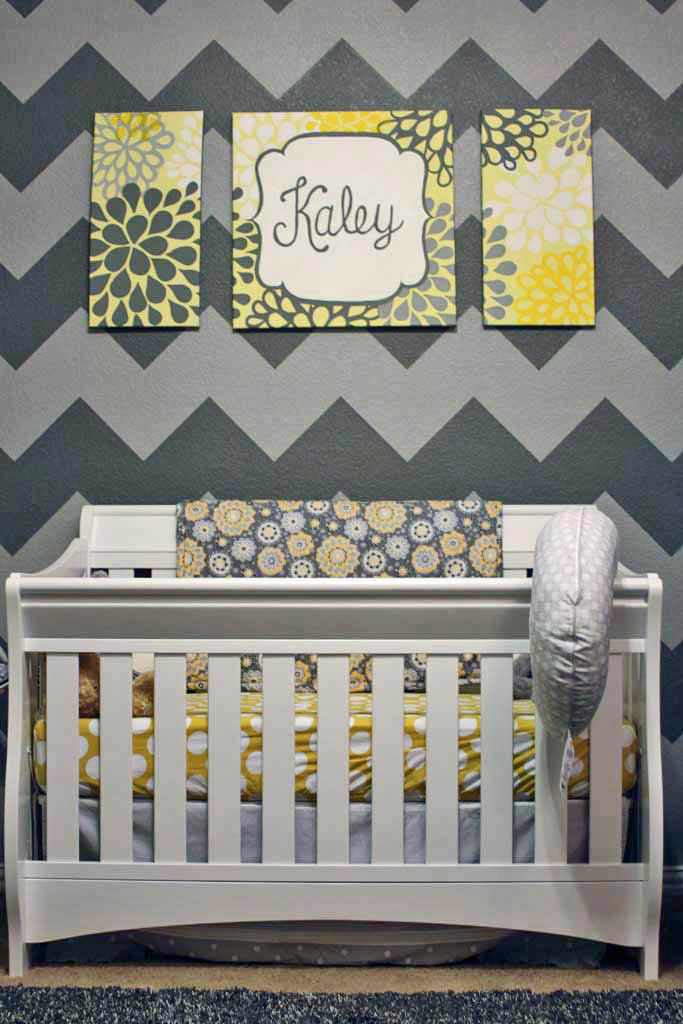
KT (the dad) painted these chevron stripes himself.  How amazing is that accent wall?? There is an area with a high recessed ceiling where they chose to hang a crystal chandelier and I think it adds the perfect amount of girliness!

amyshouse-3

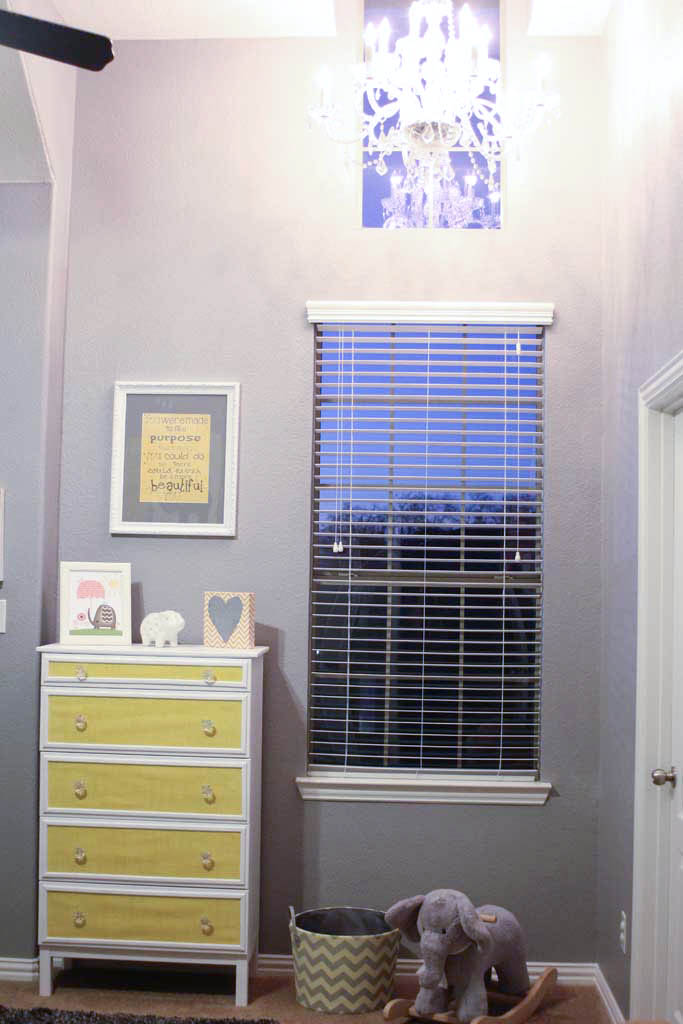
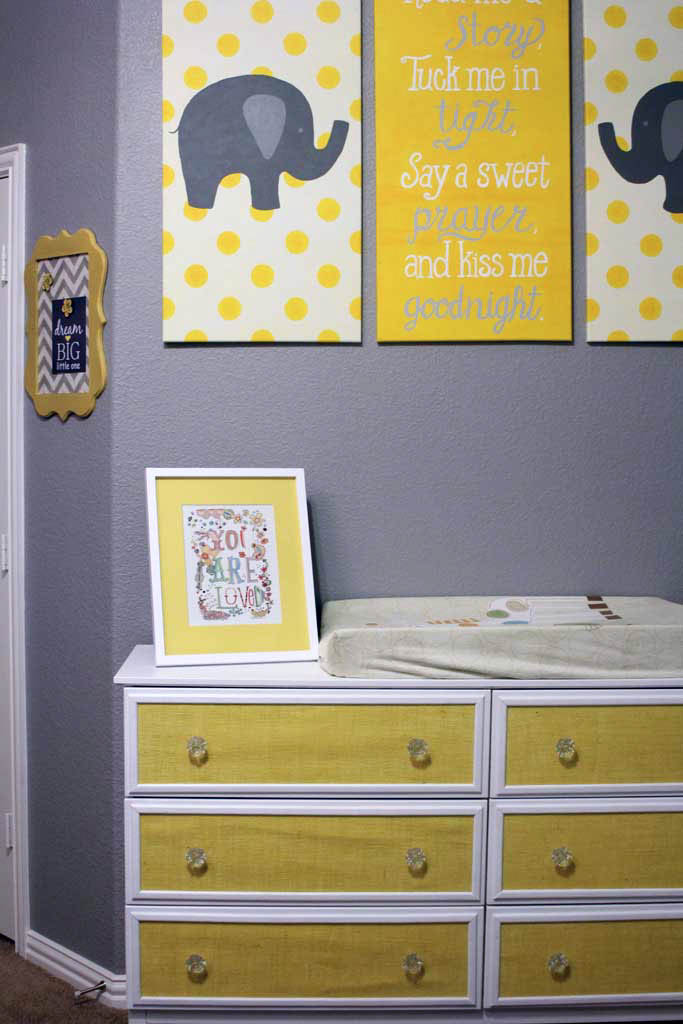
How do you like that dresser?  It is an IKEA hack, they spray adhesive-d  (yes I know that’s not a word, but its true) some yellow burlap onto the front of the dresser and framed it out with molding.  Perfection!

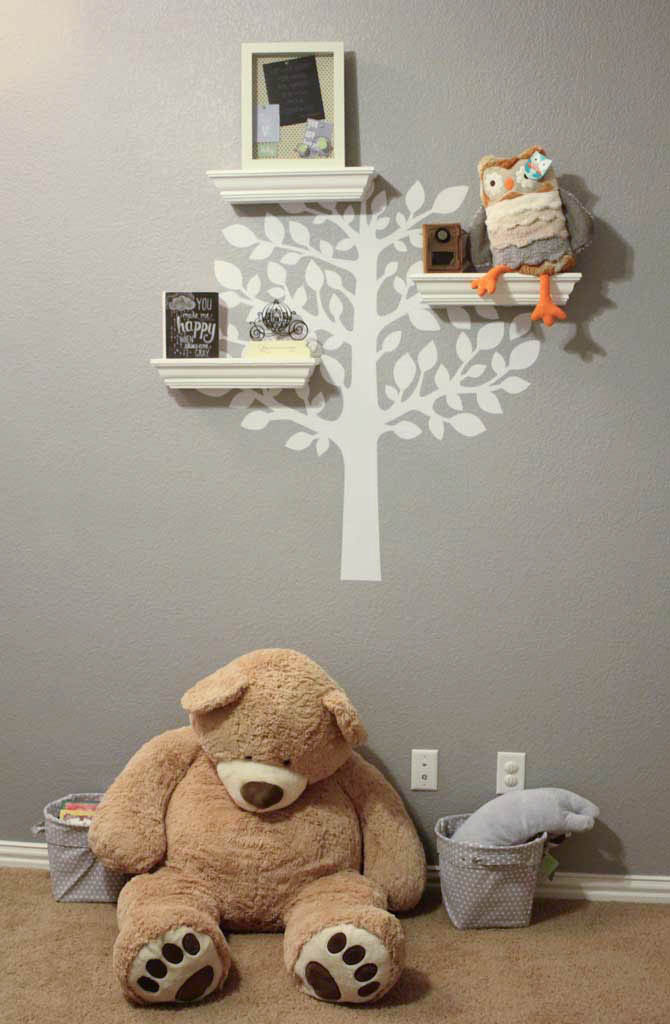
The room is filled with personalized touches and inspirational sayings.  I love this cute tree decal with the bookshelves. And both big brother and little sister have coordinating giant bears.  Its so cute how much Cooper loves his bear and I am sure Kaley will as well!

amyshouse-4-2

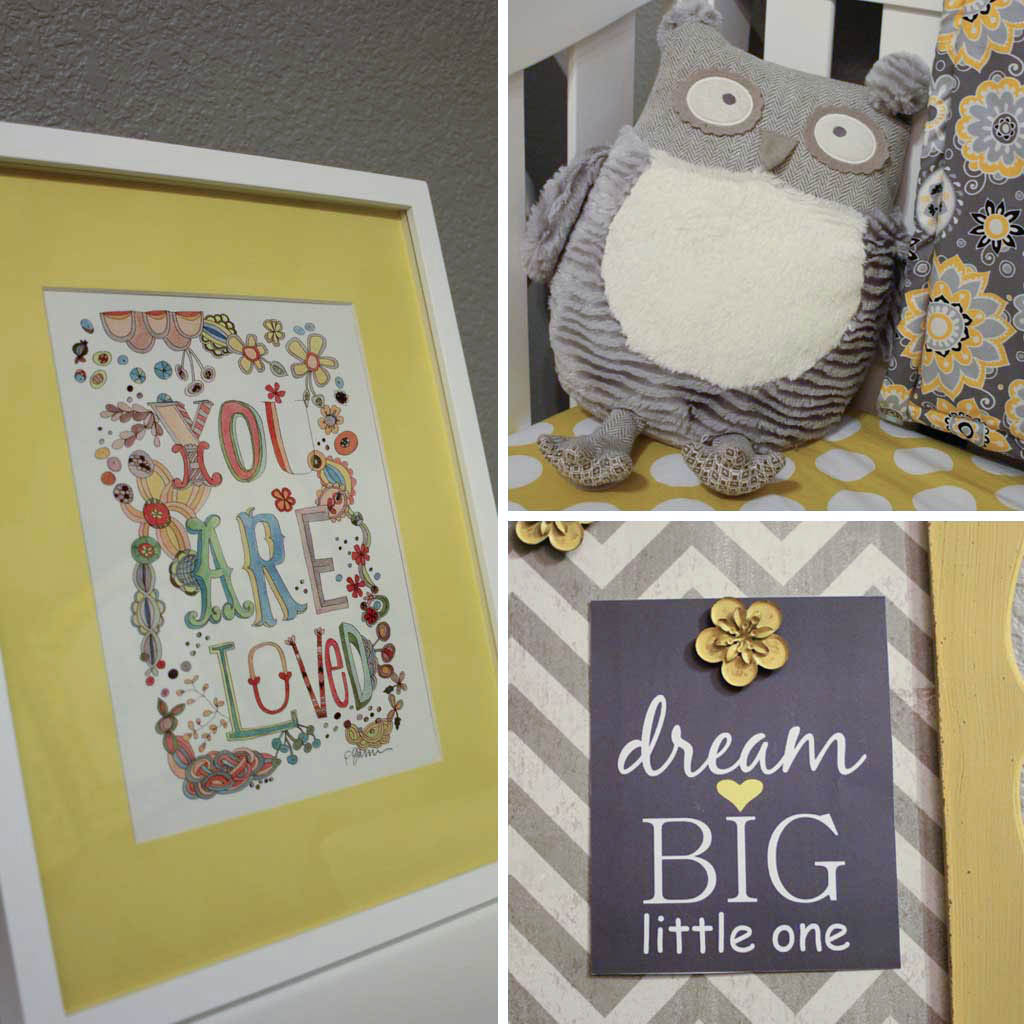
A closer look at some of the details, this is one of my favorite kid songs… and in case you can’t read the Cinderella artwork it says: ‘Love like there is no midnight’.

amyshouse-6-2

Miss Kaley will most definitely be surrounded by love and encouragement and I think this room is the perfect embodiment of that!! 

amyshouse-5-2

Her changing table is just a shorter version of the same IKEA dresser that they covered with burlap.  And her Aunt Beth who is CRAZY talented painted all the canvases in the room.  (She’s also the one who made the awesome cookie favors at my brother’s wedding shower)

amyshouse-7

Did you want a sneak peak of my awesome tour guide? He’s precious… and I’ll show you a quick peek at his room tomorrow (PS… its awesome too!)

amyshouse-2-2

And there you have it… a fabulous Gray and Yellow nursery!!

amyshouse

Big thanks to Amy and KT for letting me share Kaley’s nursery here on the blog!

Update: I shared Cooper’s awesome room here.

DIY Makeup Bag

This bag has to be one of my all time favorite sewing projects.  It was one of my first ventures into sewing other than my burp cloths.  I wanted to hand-make some of my bridesmaid gifts for my wedding, so I made 5 tote bags (I’ll have to share that later) and 10 little makeup bags.  The makeup bags were for my bridesmaids and house party and since I was making 10 of them, I didn’t make myself an extra.  Well, now its almost a year later and I wanted one, so I decided to make one for myself and share the process with y’all. Here is the bag:

DIY Makeup Bag- Super Easy Tutorial! | www.amusingmj.com

And here is a pic of them all lined up and filled with goodies for my bridal party:

DIY Makeup Bag- Super Easy Tutorial! | www.amusingmj.com

When I got started on this project I got some great help and fabulous fabric from Sarah’s Fabrics in Lawrence, KS.  If you live in Kansas City or Lawrence I highly recommend them… they are a great little shop on Mass St.  The gray and white fabric came from there.

Alright, on to the how to, here is what you need:

  • 2- 10″ x 7″ rectangles of patterned fabric
  • 2- 10″ x 7″ rectangles of solid print
  • 2- 10″ x 7″ of interfacing (I used a medium weight iron on interfacing it makes the bags stiffer so they will sit up on their own)
  • a zipper that is longer than 10″
  • 1- 1.5″ x 4″ strip of fabric the same color as your zipper. (I show two below… but you only really need one, I just like to have extra in case I goof)
  • an iron
  • a sewing machine
  • thread

DIY Makeup Bag- Super Easy Tutorial! | www.amusingmj.com


First up we will prep the zipper.  I love the way this looks on the final bag, it gives the little colored stoppers at the end of each zipper.  Take your 1.5″x4″ strip of fabric and fold it ‘hot dog style’ down the middle, and run the iron over it so you have a seam in the middle. Then fold each edge in towards the crease you just made with the iron.  Now fold it in half on that crease so that your edges are all on the inside.  This is a hard step to explain, so I have a picture (I don’t have a picture with the iron because I don’t have three hands, but picture me running an iron over the fabric between each step):

DIY Makeup Bag- Super Easy Tutorial! | www.amusingmj.com

Now take your zipper and cut off the end of it (sorry for the weird lighting on this one… i’m still mastering the whole photography thing):

DIY Makeup Bag- Super Easy Tutorial! | www.amusingmj.com

Now tuck that end of the zipper in between the two folded in sides of your small piece of fabric towards one end of that fabric and sew a line of stitching across it, then cut off the excess.  You’ll use that other half for the other end of the zipper.  Now it should look like this:

DIY Makeup Bag- Super Easy Tutorial! | www.amusingmj.com Cut your zipper off at the other end about an inch shorter than your bag (approx 9″)

DIY Makeup Bag- Super Easy Tutorial! | www.amusingmj.com And sew the other half of your small piece of fabric onto this end of the zipper, repeating the same process. You should now have a zipper that looks a lot like this:

DIY Makeup Bag- Super Easy Tutorial! | www.amusingmj.com Alright, set that to the side and grab your inside fabric pieces (solid color) and the interfacing and follow your instructions on attachment, mine you simply iron on, making sure the dotted side faces the fabric you are fusing it to.  If your fabric has a good side and a bad side, make sure you are attaching the interfacing to the ‘bad side’. It will look like this when it is finished:

DIY Makeup Bag- Super Easy Tutorial! | www.amusingmj.com Now comes what I think is the trickiest part of this project, figuring out which way which fabrics go! I’ve shown you pictures of each step so hopefully this will be easier for you guys! Place your outside fabric (the gray and white), good side up, then the zipper upside down and about 1/2 of the way zipped up and centered between the fabrics (there will be about 1/2 inch overhang on each side), then the inside piece good side down, which means the interfacing will be face up. I didn’t use a zipper foot (mostly because I’m lazy, but also because I don’t know how).  But no worries… its easy to get around.

DIY Makeup Bag- Super Easy Tutorial! | www.amusingmj.com


Put it in the machine like I have it laid out above, and stitch down the right side of that zipper until you get to the actual zipper part. Then with your needle down through the fabric so it doesn’t move, lift up your presser foot, slip your hand in between the layers of fabric and move the actual zipper up and around the presser foot (the needle part) so that you can sew through the rest of the zipper (if you don’t the presser foot will run over the zipper and move your seam off of the fabric…  trust me).

DIY Makeup Bag- Super Easy Tutorial! | www.amusingmj.com


Now your bag should have one side attached to the zipper, like this:

DIY Makeup Bag- Super Easy Tutorial! | www.amusingmj.com


Move your zipper halfway up again, and get ready to attach the other side, like before your outside fabric goes face up on the bottom, and the solid color fabric  face down on the top, but you have to make sure your zipper is face down and the other side is sandwiched in between your new fabric, like this:

DIY Makeup Bag- Super Easy Tutorial! | www.amusingmj.com Now just repeat the process from before: sew halfway down, leave your needle in the fabric, lift the presser foot and move the zipper to the other side, and sew the rest of the way.

Now your bag should look alot like this:

DIY Makeup Bag- Super Easy Tutorial! | www.amusingmj.com

I highly recommend ironing at this stage so that the seams next to the zipper are as flat as possible.  Once you’ve done that its time to seal up your bag.  IMPORTANT STEP!!! Make sure your zipper is at least partially unzipped.  You are about to seal up the other three sides of this, so if your zipper is zipped all the way up, it becomes VERY difficult to open a zipper from the inside and you will be very frustrated with yourself for forgetting this very simple step.  Just ask me how I know.

Now, fold the fabric so your outside pieces are facing each other (for mine this means my navy fabric is facing out) and sew all three remaining sides together.  Don’t forget to back stitch at the beginning and the end!

DIY Makeup Bag- Super Easy Tutorial! | www.amusingmj.com This should be one continuous line, when you get to the corners just leave your needle in the fabric, lift the presser foot and move your fabric until your next side is lined up. Once you are done, trim off any excess pieces (did I mention I’m bad at measuring and cutting so I frequently have sides that don’t line up perfectly?? Totally acceptable)

You have two choices now.  You can cut your corners off at an angle like we did for the burp cloths and then turn your piece through the zipper side… see aren’t you glad you left it partially unzipped? This will make it a rectangular pencil bag like this:

DIY Makeup Bag- Super Easy Tutorial! | www.amusingmj.com

Or you can do another step like I did to make it stand up on its own and look a little more like a makeup bag. For this step, leave it inside out and take one corner and line up the seams so they are on top of each other like this:

DIY Makeup Bag- Super Easy Tutorial! | www.amusingmj.com

Measure about an inch and a half up and stitch a line across it (again, sorry for the weird lighting on a few of these):

DIY Makeup Bag- Super Easy Tutorial! | www.amusingmj.com

Then trim off your excess:

DIY Makeup Bag- Super Easy Tutorial! | www.amusingmj.com

Rinse and repeat on your other corner, now when you turn your bag inside out, it looks like this:

DIY Makeup Bag- Super Easy Tutorial! | www.amusingmj.com


And its the perfect size for makeup, jewelry, etc!


My First Baby Blanket

I never had a blanket that I was super attached to, but I definitely had some homemade things around when I was a kid.  And I really like the idea of babies having some things made especially for them.  I mentioned in this post that I have a bazillion baby showers to attend these days and I am still faithfully making burp cloths for (almost!) all of them.  (I’m one or two showers behind right now!)  But last weekend I had the itch to try a baby blanket.  I have a ton of soft absorbent material that I bought to make the burp cloths, but its thinner than I really like it to be, but I don’t want it to go to waste, so I thought… it will be the great backing to a baby blanket!  And I have a really good friend who is about to have her first baby… a little girl! So I thought I’d try to make a baby blanket.  It turned out pretty well, but like all DIY projects, I think a few things could be done better next time!

If you have never sewn something and want to learn how, I have a couple of posts that will help you get your machine ready to start this point: how to wind a bobbin and how to thread your machine.  So if you want to make this project (super easy… I promise you can do it!)  go there, set your machine up, then come back and make a blanket with me! But disclaimer, I am NOT a master seamstress… just someone who has learned a few things, so don’t expect perfection!

So I picked 5 fabrics that I had on hand and cut 5 long strips out of them 25″ long and about 8″ wide.  I picked these sizes because 1. I think odd numbers always look better than even, 2. I wanted it to be rectangular, so if you are assuming 1/2 inch seams… that would make this somewhere around 24″ wide and 35″ long.

blanket1

Once I had all of those pieces cut out, it was just a matter of attaching them with a seam down their longest side.  To do this, put the pretty sides together and sew with a half-ish inch seam (mine ends up being smaller than that, because I find it easiest to line it up with the right side of my presser foot. )

blanket14


Line it up and sew a straight (ish) line to attach these two pieces.  Then repeat until all 5 are attached.  Your third one will like this as you sew it since you will have the two right sides together of the pieces you are stitching, the first piece will be right side up facing you:

blanket13

Once you’ve gotten them all attached, it will start to look like part of a blanket:

blanket12

Now it is time to iron.  And if you are anything like me you are thinking right now… sweet a step I get to skip! DON’T.  For a long time I never ironed anything while sewing… and once I thought to myself: you should do it once just to prove that it doesn’t change how the final product comes out.  BUT IT DOES!! I was so surprised! Ironing makes all the pieces look more professional and helps make things lay flat.  So for this project, you are going to flip that part you just sewed over and iron the seams flat.  I took a picture below to show you what I mean.  Flatten out the seam (I find this easiest to do with my finger first and then follow up with the iron.) And you can see in the picture below the seam on the left has been iron and the seam on the right has not. And you can see in this picture just how expert I am at sewing in a straight line and/or cutting in a straight line.  And by that I mean… not at all.

blanket10

Next step is to add the soft plushy side. Like before, you’ll put right sides together and sew all the way around, except for a small hole to be able to turn your blanket inside out.

blanket16


Before you turn your blanket inside out, cut your corners off like this, so the corners will be more crisp:

blanket9

And then turn the blanket right side out:

blanket8


Much like I did with the burp cloths, I then top stitched the outside.  This also gives you a way to close up the hole you used to turn it inside out.   blanket7

Although I like this look, I think on my next blanket (and of course there will be more!) I will put some sort of edging around it to make it look a little more “finished”.  You know me… if I do it, I’ll let you know how it turned out!

Your blanket is almost done! But since we don’t want it to separate in the middle, we need to do some more top-stitching.  I decided originally to just trace the seams between the 5 strips with thread to keep the two sides secured together.

blanket6

But after one seam I decided that was a boring way to do it.  (famous last words!) So I decided to just freehand loops all over the piece.  I think this is a cheater’s form of quilting, but since I’ve never quilted anything before ever… we are going to say it counts.  I really did just do random loops all over the piece. You can kind of see in the picture below what it looks like.  It pinched in a few places, but for the most part it looks okay. Although next time I think I’ll stick to my boring straight lines.

blanket5


And then you are really done!

blanket4

blanket2

A quick and easy, soft baby blanket!

blanket15